kubernetes/networking kubernetes/security
cert-manager
cert-manager v1.20.2 Spec: Reference Guide and Documentation
Core Idea
Manual certificates are fine for long-lived control-plane certs but a failure vector for workloads; cert-manager automates issuance and renewal through issuers and certificates as Kubernetes resources.
- Why automation matters and the core architecture of cert-manager.
- Worked examples: a self-signed issuer for local testing, then Let’s Encrypt production with HTTP-01 and DNS-01 (Cloudflare).
- Consuming the issued certificates from Ingress.
Cert-Manager Introduction
Manual certificate management is feasible for cluster control planes (where certs expire in 1–10 years), but it becomes a failure vector for workloads (e.g., microservices, web apps, databases inside the cluster) that require short-lived, automated certificates.
cert-manager is the standard Kubernetes controller that automates the provisioning, validation, and renewal of certificates for applications.
For details on the Kubernetes native certificate workflows, see 04 - Kubernetes Certificates API & TLS Bootstrapping.
1. Why Automation Matters
- Human Error: Forgetting to renew a certificate is one of the most common causes of web outages.
- Short-Lived Certificates: Security best practices mandate using short-lived certificates (e.g., 90 days for Let’s Encrypt). Manually rotating these every 60 days across hundreds of microservices is impossible.
- Automated Verification: Certificate issuers (like Let’s Encrypt) require validation of domain ownership (via HTTP-01 or DNS-01 challenges).
cert-managerautomates this challenge process natively inside Kubernetes.
Domain Validation Methods
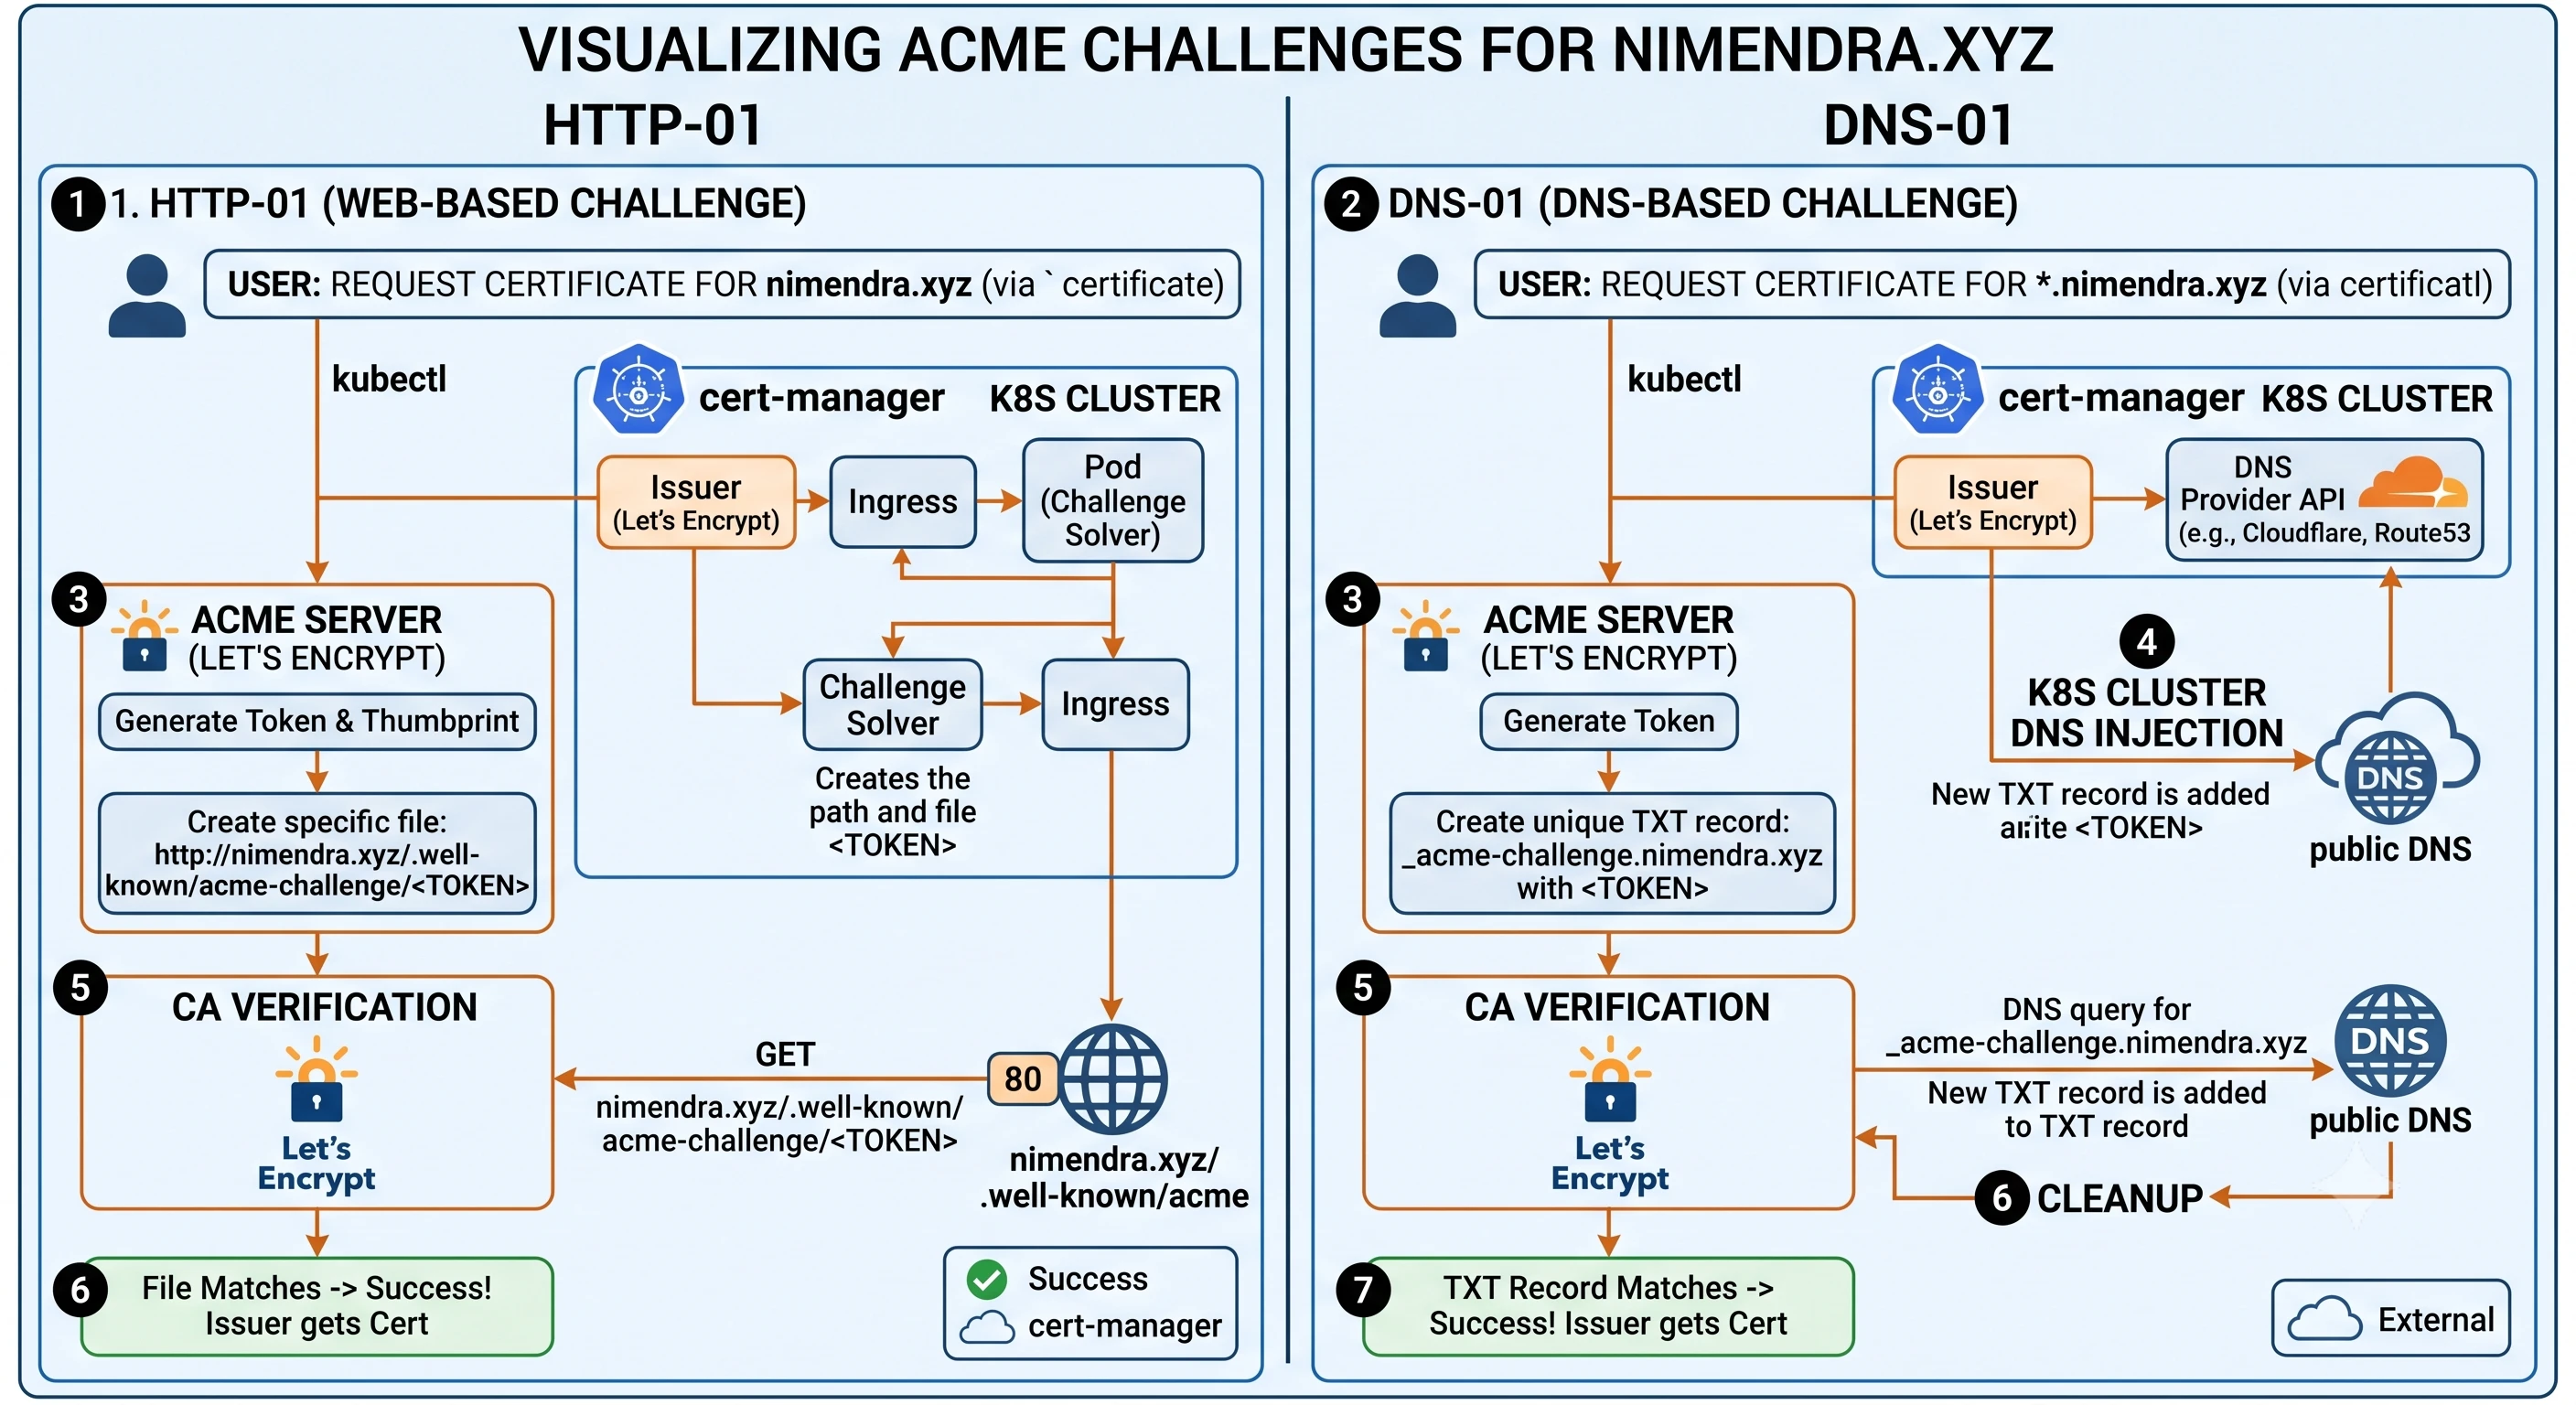
The HTTP-01 and DNS-01 are two of the most common automated domain validation methods used by Certificate Authorities(like Let’s Encrypt) via the ACME protocol(Automated Certificate Management Enviroment).
The primary difference is how you prove ownership: HTTP-01 requires placing a file on your web server, while DNS-01 requires updating a TXT record in your domain's DNS settings
Challenge Types - Let’s Encrypt
How It Works - Let’s Encrypt
RFC 8555 - Automatic Certificate Management Environment (ACME)
ExternalDNS
2. Core Architecture of cert-manager
cert-manager runs as a set of controllers in your cluster. It introduces custom resources (CRDs) to define certificate authorities and requested certificates:
graph TD
    Ingress[Ingress Resource] -->|Annotations| Certificate[Certificate CRD]
    Certificate -->|Defines requirements| Secret[Kubernetes TLS Secret]
    Certificate -->|References| Issuer[Issuer / ClusterIssuer CRD]
Issuer -->|Configured to talk to| ExternalCA[External CA: Let's Encrypt / Vault / SelfSigned]- Issuer / ClusterIssuer: Defines where certificates are requested from (e.g., Let’s Encrypt production, a local Vault server, or a self-signed CA).
Issueris namespace-scoped, whileClusterIssueris cluster-wide. - Certificate: Defines what domains, IPs, and SANs are needed, and references an
Issuer.cert-managerwatches this resource and automatically manages the underlying KubernetesSecretcontaining the private key and signed certificate.
Workload Certificate Automation with cert-manager
Worked Example 1: Local Testing with Self-Signed Issuer
This example shows how to configure an internal self-signed CA for local cluster traffic.
Step 1: Install cert-manager
# Install cert-manager CRDs and resources
kubectl apply -f https://github.com/cert-manager/cert-manager/releases/download/v1.13.3/cert-manager.yaml
Step 2: Configure a ClusterIssuer
Create ca-issuer.yaml:
apiVersion: cert-manager.io/v1
kind: ClusterIssuer
metadata:
  name: selfsigned-issuer
spec:
  selfSigned: {}
Apply it:
kubectl apply -f ca-issuer.yamlStep 3: Request a Certificate
Create app-cert.yaml:
apiVersion: cert-manager.io/v1
kind: Certificate
metadata:
  name: app-tls-cert
  namespace: default
spec:
  secretName: app-tls-secret  # Secret to populate
  duration: 2160h # 90 days
  renewBefore: 360h # 15 days before expiry
  subject:
    organizations:
    - MyCompany
  commonName: api.my-app.svc.cluster.local
  isCA: false
  usages:
    - server auth
    - client auth
  privateKey:
    algorithm: RSA
    encoding: PKCS1
    size: 2048
  issuerRef:
    name: selfsigned-issuer
    kind: ClusterIssuer
    group: cert-manager.io
Apply it:
kubectl apply -f app-cert.yamlWorked Example 2: Let’s Encrypt Production Configuration
For public internet-facing websites, you must use a trusted Certificate Authority like Let’s Encrypt. Let’s Encrypt uses the ACME protocol and supports two validation challenges:
- HTTP-01: Creates a temporary pod that hosts a validation token. Let’s Encrypt checks this token over port 80.
- DNS-01: Creates a temporary TXT record in your DNS provider (e.g. Cloudflare, AWS Route53). This allows obtaining certificates for wildcard domains (e.g.,
*.example.com).
A. HTTP-01 Validation Manifest
Create letsencrypt-production-http01.yaml:
apiVersion: cert-manager.io/v1
kind: ClusterIssuer
metadata:
  name: letsencrypt-prod
spec:
  acme:
    # The ACME server URL for Let's Encrypt Production
    server: https://acme-v02.api.letsencrypt.org/directory
    # Email address used for ACM registration and renewal alerts
    email: admin@example.com
    # Name of a secret used to store the ACME account private key
    privateKeySecretRef:
      name: letsencrypt-prod-account-key
    # Enable the HTTP-01 challenge provider
    solvers:
    - http01:
        ingress:
          ingressClassName: nginx
Apply it:
kubectl apply -f letsencrypt-production-http01.yamlB. DNS-01 Validation Manifest (Cloudflare example)
If using DNS-01, you must store your DNS API token in a secret:
apiVersion: v1
kind: Secret
metadata:
  name: cloudflare-api-token-secret
  namespace: cert-manager
type: Opaque
stringData:
  api-token: <CLOUDFLARE_API_TOKEN>
---
apiVersion: cert-manager.io/v1
kind: ClusterIssuer
metadata:
  name: letsencrypt-dns01
spec:
  acme:
    server: https://acme-v02.api.letsencrypt.org/directory
    email: admin@example.com
    privateKeySecretRef:
      name: letsencrypt-dns01-account-key
    solvers:
    - dns01:
        cloudflare:
          email: admin@example.com
          apiTokenSecretRef:
            name: cloudflare-api-token-secret
            key: api-token
Apply it:
kubectl apply -f letsencrypt-dns01-cloudflare.yaml3. Consuming Certificates in Ingress
Once the ClusterIssuer is ready, configure your applications to obtain certs automatically via Ingress routing:
apiVersion: networking.k8s.io/v1
kind: Ingress
metadata:
  name: my-app-ingress
  annotations:
    # Tells cert-manager to automatically create a Certificate CRD using this issuer
    cert-manager.io/cluster-issuer: "letsencrypt-prod"
    # Enables TLS redirection and configurations
    nginx.ingress.kubernetes.io/ssl-redirect: "true"
spec:
  ingressClassName: nginx
  tls:
  - hosts:
    - myapp.example.com
    secretName: myapp-tls-secret # cert-manager will create and renew this secret automatically
  rules:
  - host: myapp.example.com
    http:
      paths:
      - path: /
        pathType: Prefix
        backend:
          service:
            name: secure-app-service
            port:
              number: 80
When this Ingress is applied:
cert-managersees the annotationcert-manager.io/cluster-issuerand creates aCertificateresource.cert-managerspins up a temporary HTTP server, satisfies the HTTP-01 challenge with Let’s Encrypt, and downloads the signed certificate.- The signed cert is written to
myapp-tls-secret. - The NGINX Ingress controller automatically reloads, mounts the secret, and serves traffic securely over HTTPS.