Core Idea
When the default scheduler’s algorithm (taints, tolerations, node affinity) does not fit an app, run custom schedulers beside it and point pods at the one you want.
- Multiple schedulers: example configuration plus a scheduler configuration file.
- Deploying a custom scheduler as a service or as a pod, with leader election so only one instance acts.
- Day 2: verifying scheduler logs, viewing scheduler events, and selecting the scheduler per pod.
Custom Kubernetes Scheduler
In Kubernetes, the default scheduler distributes pods based on an algorithm that considers factors such as taints, tolerations, and node affinity. However, if these conditions don’t meet the needs of a specific application, you can create your own custom scheduler with additional checks and conditions.
Multiple Schedulers in Kubernetes
Kubernetes supports multiple schedulers running concurrently. Each scheduler has a unique name, such as:
default-schedulermy-schedulermy-scheduler-2
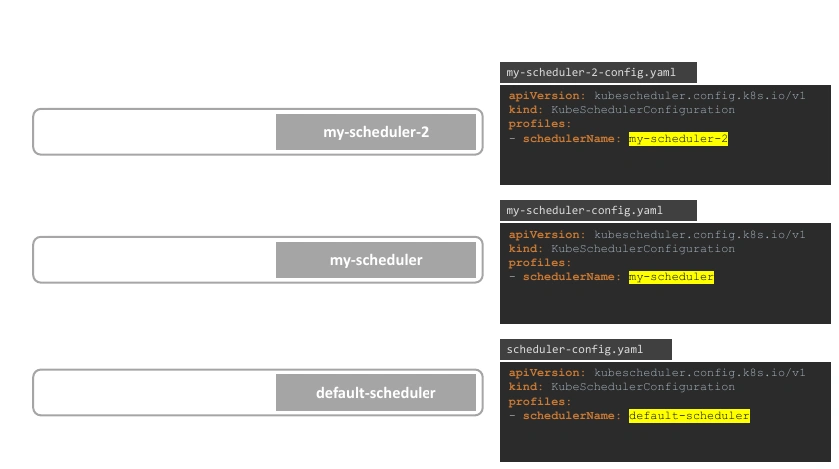
When creating a pod or deployment, you can specify which scheduler to use by setting the schedulerName.
Example of Custom Scheduler Configuration
- The default scheduler is named
default-scheduler, which is the default if no scheduler name is specified. - Custom schedulers require separate configuration files, each defining a unique
schedulerName.
Scheduler Configuration File Example
apiVersion: kubescheduler.config.k8s.io/v1
kind: KubeSchedulerConfiguration
profiles:
  - schedulerName: my-scheduler
Deploying a Custom Scheduler
You can deploy a custom scheduler using the same kube-scheduler binary or a custom-built one. Configuration files specify the scheduler’s behavior.
Deploying as a Service
- Download and configure the scheduler with its configuration file.
- Use the following service configuration to deploy the scheduler:
ExecStart=/usr/local/bin/kube-scheduler --config=/etc/kubernetes/config/my-scheduler-config.yamlDeploying as a Pod
Alternatively, deploy the scheduler as a pod. Create a Pod definition file:
apiVersion: v1
kind: Pod
metadata:
  name: my-custom-scheduler
  namespace: kube-system
spec:
  containers:
  - command:
    - kube-scheduler
    - --address=127.0.0.1
    - --kubeconfig=/etc/kubernetes/scheduler.conf
    - --config=/etc/kubernetes/my-scheduler-config.yaml
    image: k8s.gcr.io/kube-scheduler-amd64:v1.11.3
    name: kube-scheduler
Leader Election
In high-availability setups, the leader-elect option ensures only one scheduler is active at a time when multiple copies are running across different master nodes.
Example Pod with Leader Election
apiVersion: kubescheduler.config.k8s.io/v1
kind: KubeSchedulerConfiguration
profiles:
  - schedulerName: my-scheduler
    leaderElection:
      leaderElect: true
      resourceNamespace: kube-system
      resourceName: lock-object-my-scheduler
Viewing and Using Custom Schedulers
Once the scheduler is deployed, use the kubectl get pods --namespace=kube-system command to check if your custom scheduler is running.
To use the custom scheduler for a pod, add the schedulerName field in the pod definition:
apiVersion: v1
kind: Pod
metadata:
  name: nginx
  namespace: default
spec:
  schedulerName: my-custom-scheduler # <--
  containers:
  - name: nginx
    image: nginx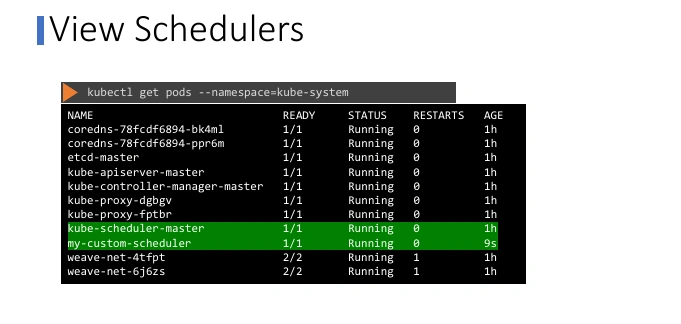
Verify Scheduler Logs
Use the following command to view logs for the custom scheduler:
kubectl logs my-custom-scheduler --namespace=kube-systemView Scheduler Events
To check which scheduler assigned the pod, use:
kubectl get events --o wideLook for the Scheduled event with your custom scheduler’s name.
Scheduler Profile
Pod Definition Example
apiVersion: v1
kind: Pod
metadata:
  name: simple-webapp-color
spec:
  priorityClassName: high-priority # <--
  containers:
    - name: simple-webapp-color
      image: simple-webapp-color
      resources:
        requests:
          memory: "1Gi"
          cpu: 10
1. Scheduling Queue
- Pods first enter the scheduling queue, where they are ordered based on their priority.
- A priority class (e.g.,
high-priority) ensures the pod with higher priority is scheduled first. - In this case, the priority class is configured with a high value (
1 million).
2. Filtering Phase
- Nodes are filtered out if they don’t meet the pod’s resource requirements (CPU and memory).
- Nodes that cannot run the pod are excluded from the list.
3. Scoring Phase
- The scoring phase assigns a score to each available node based on the resources left after reserving for the pod.
- The node with the highest available resources (after the pod’s request) gets the highest score.
4. Binding Phase
- Finally, the binding phase assigns the pod to the node with the highest score.
Scheduling Plugins
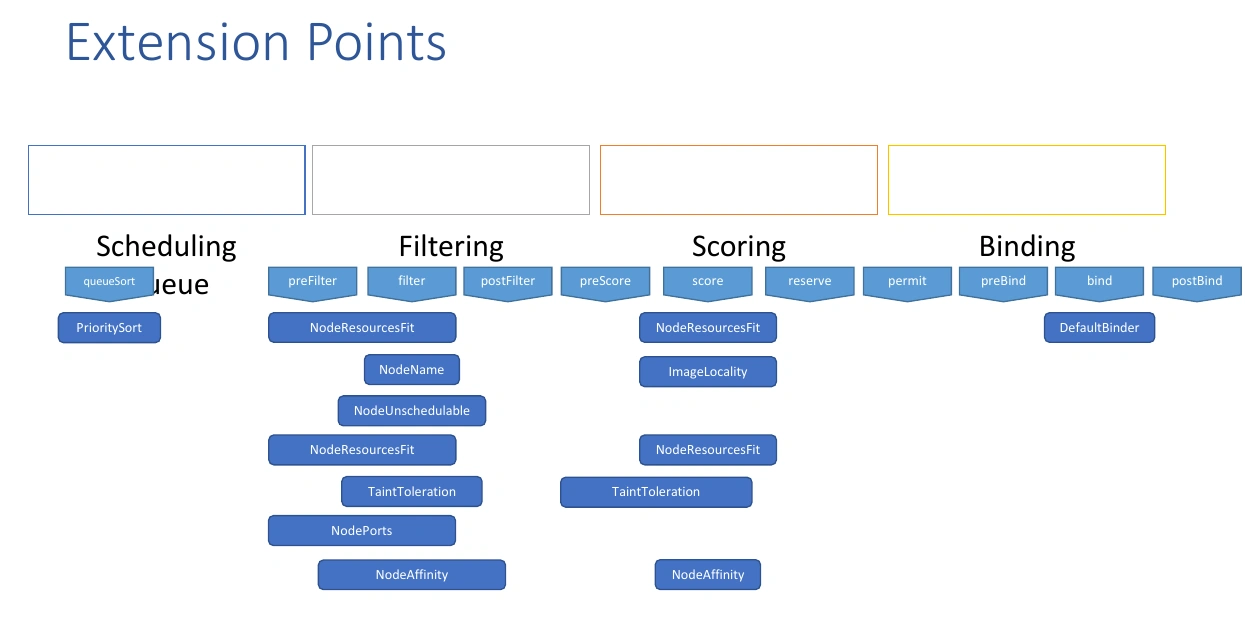
The entire scheduling process is controlled by several plugins that run at different stages of scheduling.
Common Scheduling Plugins:
- PrioritySort: Sorts the pods based on priority in the scheduling queue.
- NodeResourcesFit: Filters nodes based on resource availability.
- NodeName: Filters nodes based on a specific node name if defined in the pod spec.
- ImageLocality: Scores nodes based on whether they already have the required container images.
- DefaultBinder: Handles the final binding of the pod to the selected node.
Customizing the Scheduler with Plugins:
- You can customize the scheduler by adding your own custom plugins at any stage of the scheduling process. For example, the
TaintTolerationplugin filters nodes based on taints and tolerations. - Extension points allow you to insert your custom logic at various stages, such as preFilter, postFilter, preScore, score, preBind, and postBind.
Multiple Scheduler Profiles
With Kubernetes 1.18+, you can configure multiple scheduler profiles within a single scheduler binary, reducing the need to maintain multiple scheduler processes.
Example Scheduler Profile Configuration:
apiVersion: kubescheduler.config.k8s.io/v1
kind: KubeSchedulerConfiguration
profiles:
  - schedulerName: my-scheduler-2
    plugins:
      score:
        disabled:
          - name: TaintToleration
        enabled:
          - name: MyCustomPluginA
          - name: MyCustomPluginB
  - schedulerName: my-scheduler-3
    plugins:
      preScore:
        disabled:
          - name: '*'
      score:
        disabled:
          - name: '*'
Benefits of Multiple Profiles:
- Each profile can have its own configuration and set of plugins.
- Profiles allow you to create specialized scheduling behaviors based on specific needs.