The pod is the unit you deploy, terminate, and scale: it wraps containers with shared networking, storage, and resources, and the scheduler decides where it lands.
Pods as the unit of scaling, backed by the abstraction-layer and resource-sharing theory.
Scheduling knobs covered: node selectors, affinity and anti-affinity, topology spread constraints, resource requests and limits.
Deployment paths and lifecycle behavior, including restart policies.
Pods Intro
Important
When you deploy an app, you deploy it in a Pod
When you terminate an app, you terminate its Pod
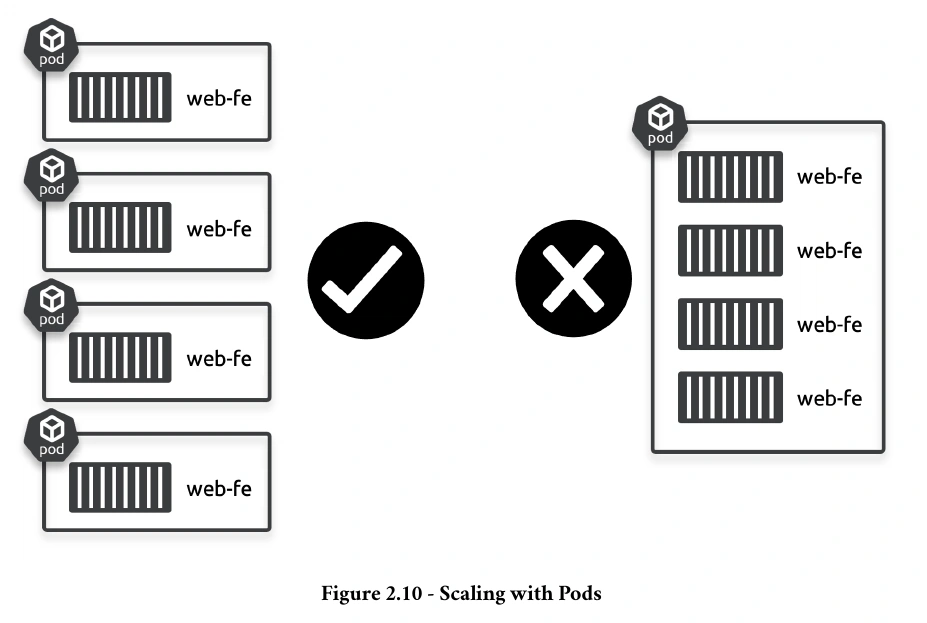
When you scale an app up, you add more Pods
When you scale an app down, you remove Pods
When you update an app, you deploy new Pods
simplest configurations run a single container per pod.
Pods are the minimum unit of scheduling in Kubernetes. As such, scaling an application up adds more Pods and scaling it down deletes Pods.
Theory
Abstraction Layer
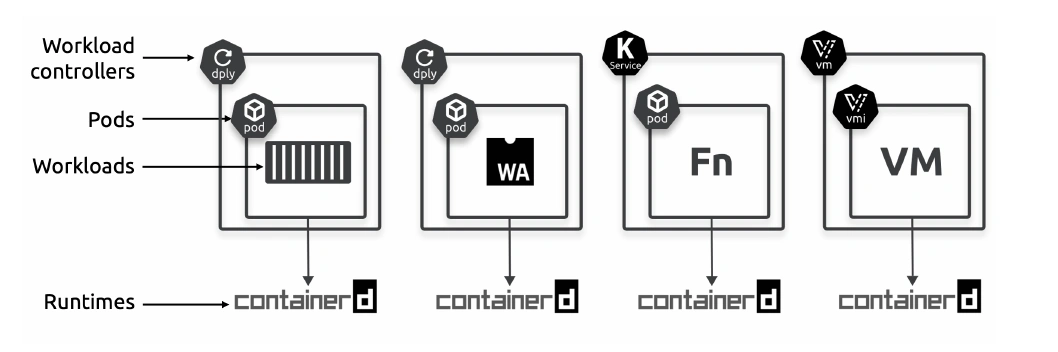
Pods abstract the details of different workload types. This means you can run containers, VMs, serverless functions, and Wasm apps in them, and Kubernetes doesn’t know the difference.
Kubernetes can focus on deploying and managing Pods without having to care what’s inside them
Heterogeneous1 workloads can run side-by-side on the same cluster, leverage the full power of the declarative Kubernetes API, and get all the other benefits of Pods
Containers and Wasm apps work with standard pods, workload controller and runtime.
Serverless functions run in standard Pods but require apps like Knative4 to extend the API with custom resources and controllers. VMs are similar, needing apps like KubeVirt5 to extend the API.
VM workloads run in a VirtualMachineInstance (VMI) instead of a Pod, but VMIs are very similar to Pods and utilize a lot of Pod features.
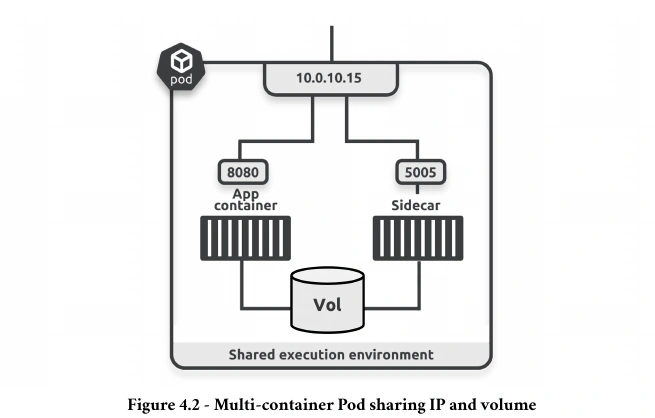
Each Pod is a shared execution environment for one or more containers. The execution environment includes a network stack, volumes, shared memory, and more.
Shared filesystem and volumes (mnt namespace)
Shared network stack (net namespace)
Shared memory (IPC namespace)
Shared process tree (pid namespace)
Shared hostname (uts namespace)
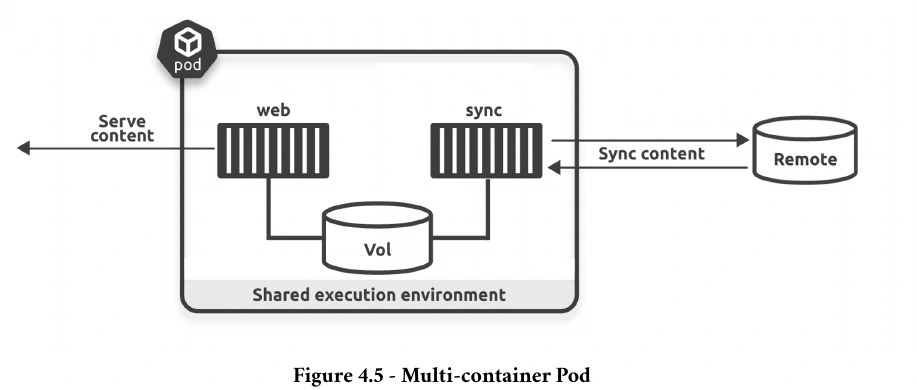
Other apps and clients can access the containers via the Pod’s 10.0.10.15 IP address — the main app container is available on port 8080 and the sidecar on port 5005. They can use the Pod’s localhost adapter if they need to communicate with each other inside the Pod. Both containers also mount the Pod’s volume and can use it to share data. For example, the sidecar container might sync static content from a remote Git repo and store it in the volume where the main app container reads it and serves it as a web page.
All containers in a Pod are always scheduled to the same node.
Coz Pods are a shared execution environment, and you can’t easily share memory, networking, and volumes across nodes.
You should only put containers in the same Pod if they need to share resources such as memory, volumes, and networking. If your only requirement is to schedule two workloads to the same node, you should put them in their own Pods and use one of the following options to schedule them together
Starting a Pod is also an atomic operation. This means Kubernetes only ever marks a Pod as running when all its containers are started. For example, if a Pod has two containers and only one is started, the Pod is not ready.
Pods provide a lot of advanced scheduling features,
nodeSelectors
the simplest way of running Pods on specific nodes.
You give the nodeSelector a list of labels, and the scheduler will only assign the Pod to a node with all the labels.
Affinity and anti-affinity
Affinity rules specify that pods should or must be placed together on certain nodes or alongside other pods.
Node Affinity
Pod Affinity Anti-affinity rules specify that pods should not or must not be placed on certain nodes or alongside other pods.
A hard node affinity rule specifying the project=qsk label tells the scheduler it can only run the Pod on nodes with the project=qsk label.
It won’t schedule the Pod if it can’t find a node with that label.
If it was a soft rule, the scheduler would try to find a node with the label, but if it can’t find one, it’ll still schedule it.
If it was an anti-affinity rule, the scheduler would look for nodes that don’t have the label.
The logic works the same for Pod-based rules.
Topology spread constraints
flexible way of intelligently spreading Pods across your infrastructure for availability, performance, locality, or any other requirements.
A typical example is spreading Pods across your cloud or datacenter’s underlying availability zones for high availability (HA). However, you can create custom domains for almost anything, such as scheduling Pods closer to data sources, closer to clients for improved network latency, and many more reasons.
Resource requests and resource limits
Resource requests and resource limits are very important, and every Pod should use them.
They tell the scheduler how much CPU and memory a Pod needs, and the scheduler uses them to select nodes with enough resources. If you don’t specify them, the scheduler cannot know what resources a Pod requires and may schedule it to a node with insufficient resources.
Deploying
Define the Pod in a YAML manifest file
Post the manifest to the API server
The request is authenticated and authorized
The Pod spec is validated
The scheduler filters nodes based on nodeSelectors, affinity and anti-affinity rules, topology spread constraints, resource requirements and limits, and more
The Pod is assigned to a healthy node meeting all requirements
The kubelet on the node watches the API server and notices the Pod assignment
The kubelet downloads the Pod spec and asks the local runtime to start it
The kubelet monitors the Pod status and reports status changes to the API server
If the scheduler can’t find a suitable node, it marks it as pending.
Pod only starts servicing requests when all its containers are up and running.
Mortal means you create a Pod, it executes a task, and then it terminates. As soon as it completes, it gets deleted and cannot be restarted.
Immutable means you cannot modify them after they’re deployed.
if you need to change or update a Pod, you should always replace it with a new one running the updates. You should never log on to a Pod and change it.
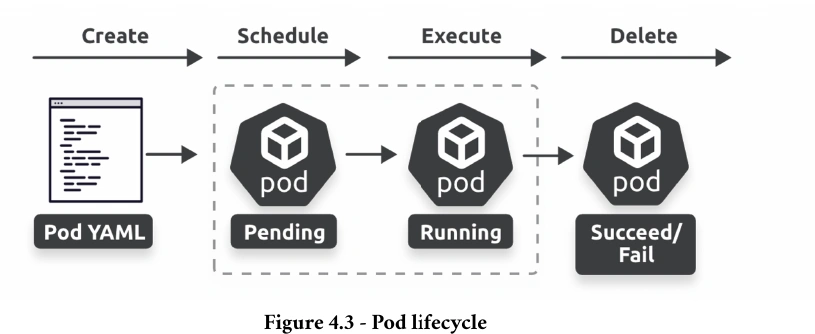
You define a Pod in a declarative YAML object that you post to the API server.
It goes into the pending phase while the scheduler finds a node to run it on.
Assuming it finds a node, the Pod gets scheduled, and the local kubelet instructs the runtime to start its containers.
Once all of its containers are running, the Pod enters the running phase.
It remains in the running phase indefinitely if it’s a long-lived Pod, such as a web server.
If it’s a short-lived Pod, such as a batch job, it enters the succeeded state as soon as all containers complete their tasks.
Restart Policies
Pod Lifecycle and Replacement
Kubernetes does not restart Pods; it replaces them with new ones in scenarios such as:
Node failures.
Node maintenance or resource juggling.
Scaling, updates, or rollbacks.
Replaced Pods have a new UID, IP address, and no prior state.
Important
Kubernetes can’t restart Pods,
it can definitely restart containers.
Container Restart Policies
Kubernetes can restart individual containers in a Pod based on the spec.restartPolicy.
Restart policies apply to all containers in the Pod (excluding init containers).
Restart Policy Options
Always:
Restart containers regardless of the exit status.
Suitable for long-living apps (e.g., web servers, databases).
OnFailure:
Restart containers only if they fail.
Ideal for batch workloads or task-based apps.
Never:
Do not restart containers.
Used when container failures are acceptable.
Static Pods & Controllers
Deploying directly from a Pod manifest creates a static Pod that cannot self-heal, scale, or perform rolling updates.
kubelets are limited to restarting containers on the same node.
Pods deployed via workload resources get all the benefits of being managed by a highly available controller that can restart them on other nodes, scale them when demand changes, and perform advanced operations such as rolling updates and versioned rollbacks.
The local kubelet can still attempt to restart failed containers, but if
the node fails or gets evicted, the controller can restart it on a different node
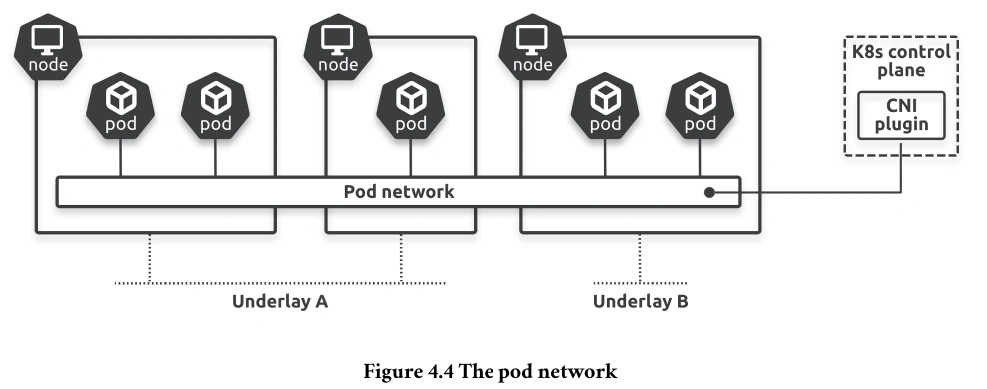
The pod network
Every Kubernetes cluster runs a pod network and automatically connects all Pods to it.
It’s usually a flat Layer-2 overlay network that spans every cluster node and allows every Pod to talk directly to every other Pod, even if the remote Pod is on a different cluster node.
Pod network is implemented by a third-party plugin(eg: Cilium, Kindnet for KIND cluster) that interfaces with Kubernetes and configures the network via the Container Network Interface (CNI).
A lot of clusters create a very open pod network with little or no security. you should use Kubernetes Network Policies and other measures to secure it.
Multi-container pods
According to microservices design patterns, every container should have a single clearly defined responsibility. For example, an application syncing content from a repository and serving it as a web page has two distinct responsibilities:
Init Container
The purpose of init containers is to prepare and initialize the environment so it’s ready for application containers.
Kubernetes guarantees they’ll start and complete before the main app container starts. It also guarantees they’ll only run once.
Assume you have another application that needs a one-time clone of a remote repository before starting. Again, instead of bloating and complicating the main application with the code to clone and prepare the content (knowledge of the remote server address, certificates, auth, file sync protocol, checksum verifications, etc.), you implement that in an init container that is guaranteed to complete the task before the main application container starts.
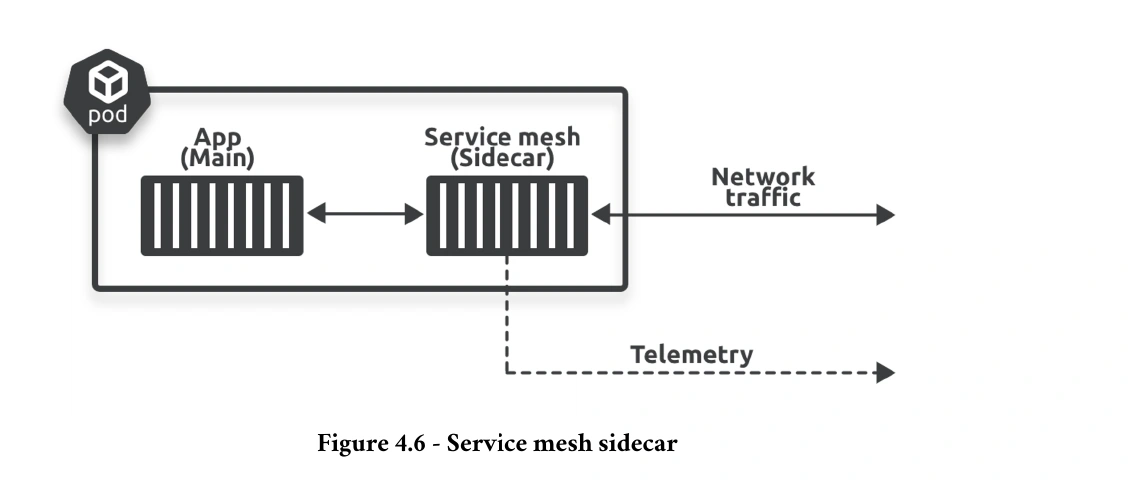
Sidecars
Regular containers that run at the same time as application containers for the entire lifecycle of the Pod.
Sidecar Container
You should choose a multi-container Pod when your application has tightly coupled components needing to share resources such as memory or storage. In most other cases, you should use single-container Pods and loosely couple them over the network.
A sidecar container is a container that runs alongside a primary application container within the same Kubernetes pod. The sidecar container complements the primary container by providing additional functionality or support. Both containers share the same pod resources (like storage and network), allowing them to communicate and cooperate effectively.
The sidecar pattern is widely used in Kubernetes for creating robust, modular, and scalable applications. It’s a core concept in technologies like service meshes (e.g., Istio, Linkerd) and log/metric collection systems.
Remember, you CANNOT edit specifications of an existing POD other than the below.
spec.containers[*].image
spec.initContainers[*].image
spec.activeDeadlineSeconds
spec.tolerations
For example, you cannot edit the environment variables, service accounts, and resource limits (all of which we will discuss later) of a running pod. But if you really want to, you have 2 options:
Run the kubectl edit pod command. This will open the pod specification in an editor (vi editor). Then edit the required properties. When you try to save it, you will be denied. This is because you are attempting to edit a field on the pod that is not editable.
A copy of the file with your changes is saved in a temporary location as shown above.
You can then delete the existing pod by running the command:
kubectl delete pod webapp
Then create a new pod with your changes using the temporary file
kubectl create -f /tmp/kubectl-edit-ccvrq.yaml
The second option is to extract the pod definition in YAML format to a file using the command
kubectl get pod webapp -o yaml > my-new-pod.yaml
Then make the changes to the exported file using an editor (vi editor). Save the changes
vi my-new-pod.yaml
Then delete the existing pod
kubectl delete pod webapp
Then create a new pod with the edited file
kubectl create -f my-new-pod.yaml
Edit Deployments
With Deployments, you can easily edit any field/property of the POD template. Since the pod template is a child of the deployment specification, with every change the deployment will automatically delete and create a new pod with the new changes. So if you are asked to edit a property of a POD part of a deployment you may do that simply by running the command
kubectl edit deployment my-deployment
Hands on Notes
Manifest file
apiVersion: Specifies the API schema.
kind: Identifies the resource type.
metadata: Includes identifying information and labels/annotations.
spec: Describes the desired state of the resource.
Remote command execution lets you send commands to a container from your local shell. The container executes the command and returns the output to your shell.
kubectl exec hello-pod -- ps
An exec session connects your local shell to the container’s shell and is the same as being logged on to the container.
kubectl exec -it hello-pod -- sh
Update
Warning
Pods are immutable and cannot have certain fields updated after they are created.
Specifically, fields like QoS (Quality of Service) settings and resource requests/limits cannot be modified directly for an existing Pod.
Pod hostname
Pods get their names from their YAML file’s metadata.name field and Kubernetes uses this as the hostname for every container in the Pod.
kind: PodapiVersion: v1metadata: name: hello-pod #<-Pod hostname.Inherited by all containers. labels:<Snip>
env | grep HOSTNAMEHOSTNAME=hello-pod
The container’s hostname matches the name of the Pod. All containers would have the same hostname if it was a multi-container Pod.
Pod immutability
Pods are designed as immutable objects, meaning you shouldn’t change them after deployment.
Immutability applies at two levels:
Object immutability (the Pod)
App immutability (containers)
Kubernetes handles object immutability by preventing changes to a running Pod’s configuration.
However, Kubernetes can’t always prevent you from changing the app and filesystem in containers. You’re responsible for ensuring containers and their apps are stateless and immutable.
A CPU. The scheduler reads this and assigns it to a node with enough resources. If it can’t find a suitable node, it marks the Pod as pending, and the cluster autoscaler will attempt to provision a new cluster node.
While a container executes, it is guaranteed its minimum requirements (requests). However, it’s allowed to use more if the node has additional available resources, but it’s never allowed to use more than what you specify in its limits.
For multi-container Pods, the scheduler combines the requests for all containers and finds a node with enough resources to satisfy the full Pod.
init container
apiVersion: v1kind: Podmetadata: name: initpod labels: app: initializerspec: initContainers: - name: init-ctr # Pinned to 1.28 as newer versions have a sketchy nslookup command that doesn't work. Can also use a non-busybox image here image: busybox:1.28.4 command: ['sh', '-c', 'until nslookup k8sbook; do echo waiting for k8sbook service; sleep 1; done; echo Service found!'] containers: - name: web-ctr image: nigelpoulton/web-app:1.0 ports: - containerPort: 8080