kubernetes kubernetes/cka kubernetes/networking kubernetes/primer
Core Idea
Helm is the package manager for Kubernetes: charts plus a few commands install, update, or uninstall application stacks, and chart templates handle the per-environment variation.
- Objective: automate install, update, and uninstall of K8s app packages with just a few commands (docs and Artifact Hub linked).
- Templating deep dive: loops, conditionals,
with, defaults, the.Releaseobject, helpers, pipelines, and map iteration.- Advanced chart features: chart hooks and chart signing.
What is Helm ?
The Objective of Helm is to make an easy and automates management(install, update or uninstall) of packages for k8s applications and deploy them with just few commands.
Kubernetes applications packages are structured in the Helm packaging format called Helm Charts.
A Helm chart is a set of YAML manifests and templates that describes Kubernetes resources (Deployments, Secrets, CRDs, etc.) and defined configurations needed for the Kubernetes application, and is also easy to deploy in a Kubernetes cluster or in a single node with just one command.
Sample Chart Directory Structure:
my-app/
├── charts/
├── crds/
│   └── custom-resource.yaml
├── templates/
│   ├── NOTES.txt
│   ├── _helpers.tpl
│   ├── deployment.yaml
│   ├── service.yaml
│   ├── ingress.yaml
├── Chart.yaml
├── values.yaml
├── README.md
└── tests/
    └── test-connection.yaml
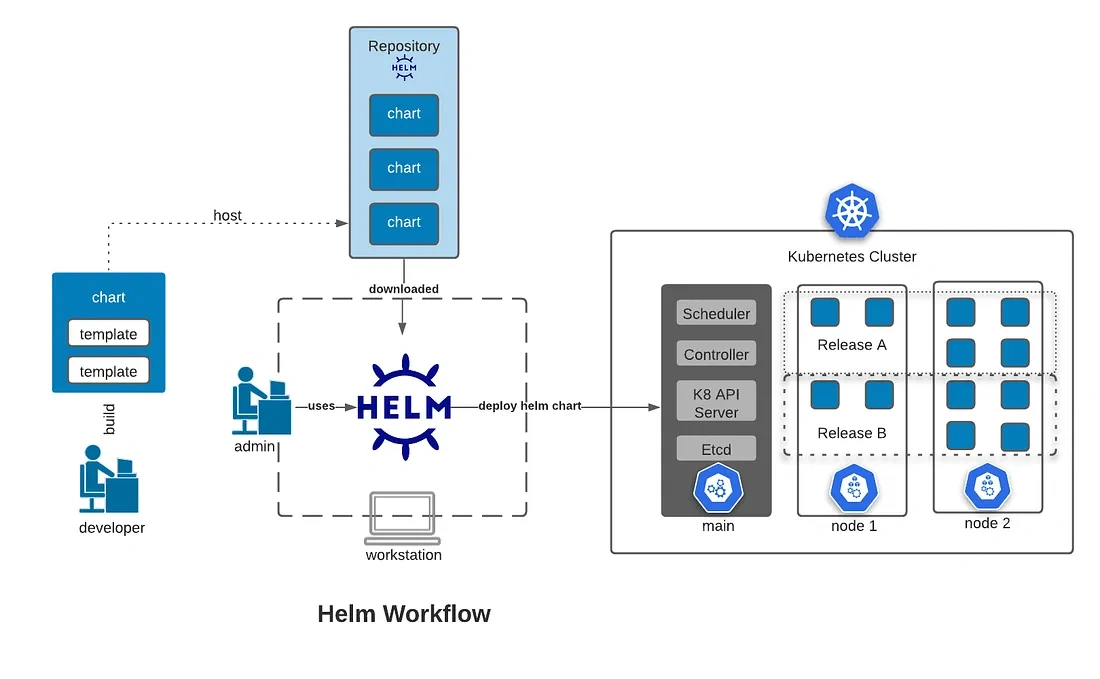
Helm Architecture
- The Helm Client (The CLI for end users.)
- Local chart development
- Managing repositories and releases
- Helm Library interaction to execute the users demands (sending charts to be installed or requesting upgrading or uninstalling existing releases)
- The Helm Library ( The Logic for helm operations execution)
- The components that communicate with the kubernetes API through the K8s client library.
- It doesn’t need its own database. Instead, it stores the information in Kubernetes secrets.
- Combines charts and Configurations to build a release.
- Installs, upgrades or uninstall charts
- Encapsulates the helm logic, which allows portability between different systems
Helm Charts
Syntax
1. Loops (range)
The range keyword is used to iterate over a list, dictionary, or array.
Example: Iterating Over a List
Input in values.yaml:
names:
  - Alice
  - Bob
  - Charlie
Template (templates/configmap.yaml):
apiVersion: v1
kind: ConfigMap
metadata:
  name: example-configmap
data:
  users: |
{{- range .Values.names }}
    - {{ . }}
{{- end }}
Rendered Output:
apiVersion: v1
kind: ConfigMap
metadata:
  name: example-configmap
data:
  users: |
    - Alice
    - Bob
    - Charlie
2. Conditionals (if, else, else if)
Used to apply logic based on conditions.
Example: Enabling a Feature
Input in values.yaml:
featureEnabled: trueTemplate (templates/deployment.yaml):
apiVersion: apps/v1
kind: Deployment
metadata:
  name: conditional-example
spec:
  replicas: 1
  template:
    spec:
      containers:
      - name: app
        image: nginx
{{- if .Values.featureEnabled }}
        env:
        - name: FEATURE_FLAG
          value: "enabled"
{{- else }}
        env:
        - name: FEATURE_FLAG
          value: "disabled"
{{- end }}
Rendered Output (when featureEnabled is true):
apiVersion: apps/v1
kind: Deployment
metadata:
  name: conditional-example
spec:
  replicas: 1
  template:
    spec:
      containers:
      - name: app
        image: nginx
        env:
        - name: FEATURE_FLAG
          value: "enabled"
3. Using with
The with keyword simplifies templates by creating a new scope for a specific value.
Example: Simplifying Access to Nested Objects
Input in values.yaml:
config:
  database:
    host: db.example.com
    port: 5432
Template (templates/configmap.yaml):
apiVersion: v1
kind: ConfigMap
metadata:
  name: db-config
data:
{{- with .Values.config.database }}
  DB_HOST: "{{ .host }}"
  DB_PORT: "{{ .port }}"
{{- end }}
Rendered Output:
apiVersion: v1
kind: ConfigMap
metadata:
  name: db-config
data:
  DB_HOST: "db.example.com"
  DB_PORT: "5432"
4. Default Values (default)
The default function provides a fallback value if the specified key is missing or empty.
Example: Setting Default Values
Template (templates/deployment.yaml):
apiVersion: apps/v1
kind: Deployment
metadata:
  name: default-example
spec:
  replicas: 1
  template:
    spec:
      containers:
      - name: app
        image: "{{ .Values.image.repository | default "nginx:latest" }}"
Rendered Output (when image.repository is not set):
apiVersion: apps/v1
kind: Deployment
metadata:
  name: default-example
spec:
  replicas: 1
  template:
    spec:
      containers:
      - name: app
        image: "nginx:latest"
5. Accessing the Release Object (.Release)
The .Release object contains information about the release.
Example: Using Release Name and Namespace
Template (templates/service.yaml):
apiVersion: v1
kind: Service
metadata:
  name: {{ .Release.Name }}-service
  namespace: {{ .Release.Namespace }}
spec:
  type: ClusterIP
  ports:
  - port: 80
    targetPort: 8080
Rendered Output:
apiVersion: v1
kind: Service
metadata:
  name: myrelease-service
  namespace: default
spec:
  type: ClusterIP
  ports:
  - port: 80
    targetPort: 8080
6. Combining Templates with _helpers.tpl
Reusable helper templates are stored in _helpers.tpl.
Example: Defining and Using a Helper
templates/_helpers.tpl:
{{- define "fullname" -}}
{{ .Release.Name }}-{{ .Chart.Name }}
{{- end }}
Template (templates/deployment.yaml):
apiVersion: apps/v1
kind: Deployment
metadata:
  name: {{ include "fullname" . }}
spec:
  replicas: 1
Rendered Output:
apiVersion: apps/v1
kind: Deployment
metadata:
  name: myrelease-myapp
spec:
  replicas: 1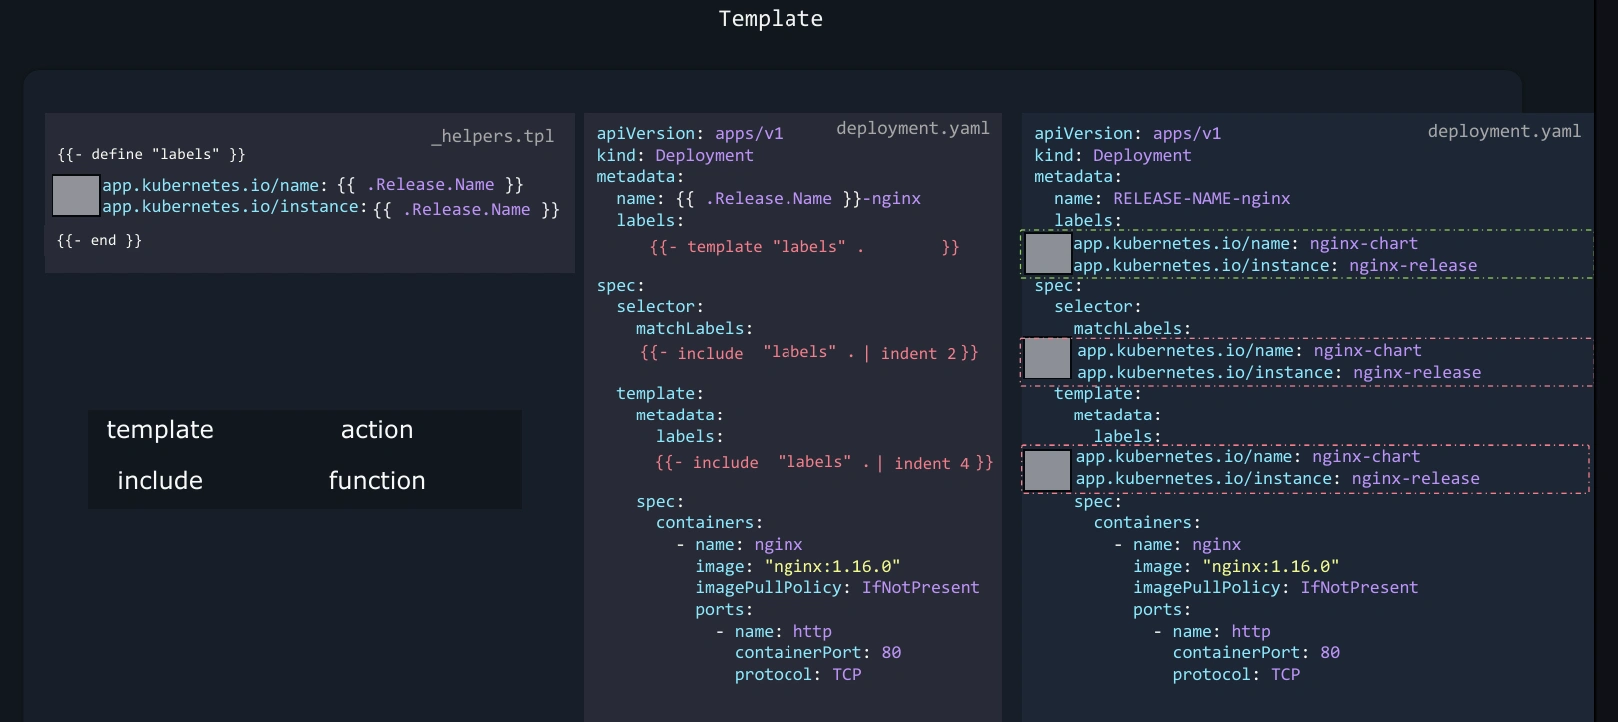
7. Using Pipelines
Pipelines allow chaining multiple functions.
Example: Chaining Default and Uppercase
Template (templates/configmap.yaml):
apiVersion: v1
kind: ConfigMap
metadata:
  name: example-configmap
data:
  ENV: "{{ .Values.env | default "development" | upper }}"
Rendered Output (when env is not set):
apiVersion: v1
kind: ConfigMap
metadata:
  name: example-configmap
data:
  ENV: "DEVELOPMENT"
8. Iterating Over a Map
Maps can be iterated with range.
Example: Iterating Over Key-Value Pairs
Input in values.yaml:
labels:
  app: my-app
  tier: backend
Template (templates/deployment.yaml):
metadata:
  labels:
{{- range $key, $value := .Values.labels }}
    {{ $key }}: "{{ $value }}"
{{- end }}
Rendered Output:
metadata:
  labels:
    app: "my-app"
    tier: "backend"
Chart Hooks
Helm chart hooks are special mechanisms that allow you to intervene in the lifecycle of a Helm release by running custom actions at specific points.
These hooks are useful for tasks like migrations, configuration setups, or cleanup.
What Are Helm Hooks?
Hooks are Kubernetes resources (like Pods, Jobs, ConfigMaps, etc.) defined in your chart templates that Helm executes at specific points in the release lifecycle.
apiVersion: batch/v1
kind: Job
metadata:
	name: schema-setup
	annotations:
		"helm.sh/hook": post-install,post-upgrade
		"helm.sh/hook-weight": "-5"
		"helm.sh/hook-delete-policy": hook-succeeded
spec:
	template:
		spec:
			containers:
			- name: schema-setup
			  image: myapp-schema-setup:latest
			restartPolicy: OnFailure
Helm hooks can be used for various purposes, such as:
- Database Migrations: Before upgrading a release, you might want to run a database migration.
- Populating Data: After installing a release, you might want to populate a database with initial data.
- Cleanup: Before deleting a release, you might want to clean up resources that aren’t managed directly by Helm.
| Hook Name | Description |
|---|---|
pre-install | Runs before any resources are installed. |
post-install | Runs after all resources are installed. |
pre-upgrade | Runs before any resources are upgraded. |
post-upgrade | Runs after all resources are upgraded. |
pre-delete | Runs before any resources are deleted. |
post-delete | Runs after all resources are deleted. |
pre-rollback | Runs before any resources are rolled back. |
post-rollback | Runs after all resources are rolled back. |
test | Used for Helm tests, triggered by helm test. |
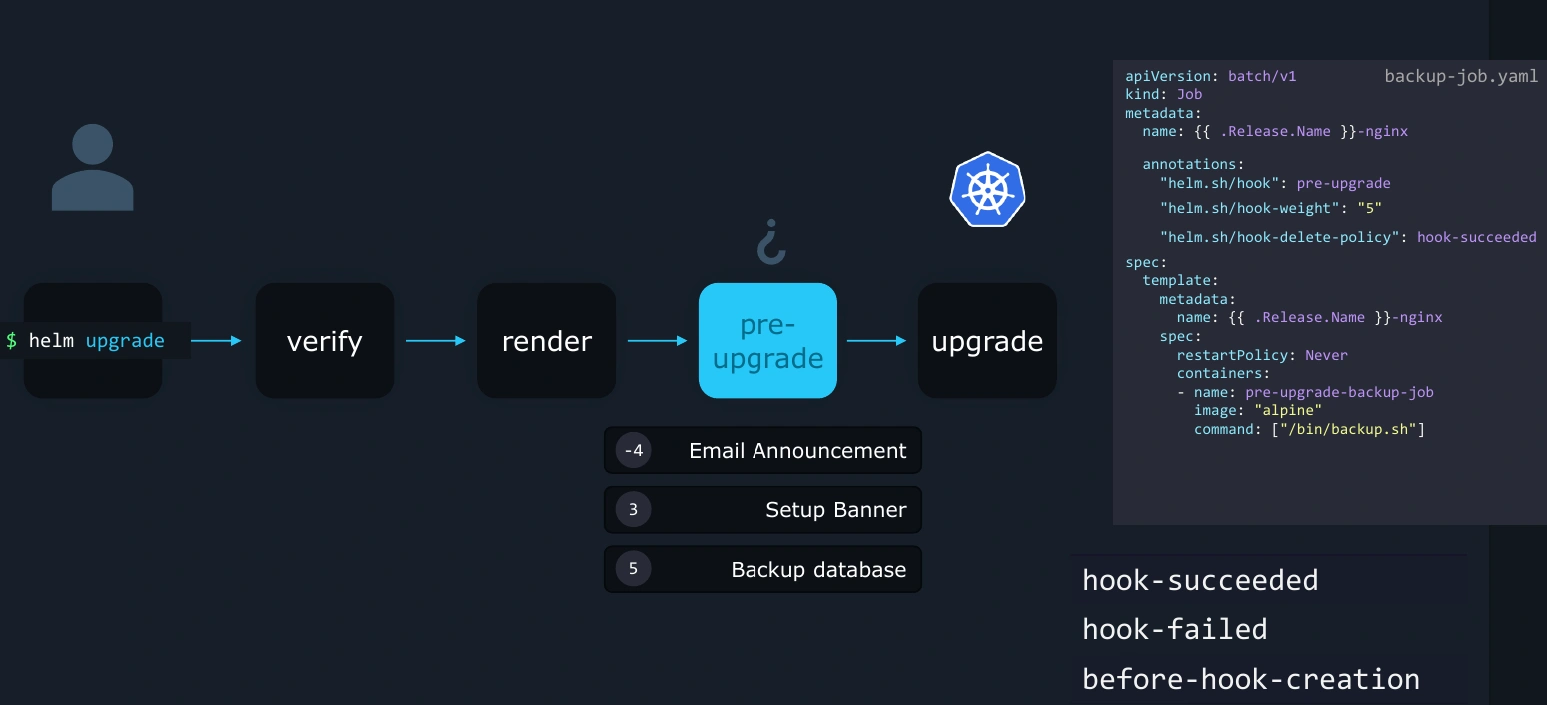
Chart Signing in Helm
How It Works
-
Key Pair Generation:
- A GPG (GNU Privacy Guard) key pair is generated, consisting of:
- Private Key: Used to sign the chart.
- Public Key: Shared for others to verify the signature.
- A GPG (GNU Privacy Guard) key pair is generated, consisting of:
-
Signing the Chart:
- The chart is packaged with
helm packageand signed with--sign, creating a signature file (.prov).
- The chart is packaged with
-
Verification:
- Helm verifies the
.provfile against the chart and the public key to ensure authenticity and integrity.
- Helm verifies the
Steps for Chart Signing
1. Generate a GPG Key Pair
gpg --full-generate-key- Select a type (e.g., RSA).
- Choose a key size (e.g., 4096 bits).
- Provide a name and email address.
2. Export the Public Key
Share the public key with users to verify the chart.
gpg --export --armor "your-email@example.com" > public.key3. Sign the Chart
Package and sign the Helm chart:
helm package mychart/ --sign --key "your-email@example.com" --keyring ~/.gnupg/secring.gpgThis creates:
mychart-<version>.tgz: The packaged chart.mychart-<version>.tgz.prov: The signature file.
4. Verify the Chart
To verify the chart’s signature:
helm verify mychart-<version>.tgz